I haven't written much on the blog recently, but it's not because I'm not busy. In fact, it is (to the consternation of my wife) quite the opposite. Here's what's going on:
DOWN TO HIGH STREET
After building and growing the Columbus music discography database in preparation for the oral history book project currently titled "Down To High Street," I've actually started scheduling and conducting interviews. This is going to be a long process, based on the flexibility to chat with interview subjects, so I have no designs on completing it this year. My hope is by end of 2019, interviews will be done and I'll be on to organizing and editing.
EVEN MORE SMALL STORIES
Upon the release of Small Stories last year, in addition to raised eyebrows about some of the stories from certain family members, I also got a barrage of, "Hey, you know what story was hilarious that you left out? This one!" I compiled those stories, and managed to recall a few others that were not previously written up, and have started the process of fleshing out the full stories for a second volume of Small Stories, which incidentally, is now available over at Amazon via Kindle for just .99 cents.
Showing posts with label project. Show all posts
Showing posts with label project. Show all posts
Pinterest Project: Kid's Doll House
My daughter Nina wanted a playhouse for her variety of dolls and creatures, and from what I saw on Pinterest and in-stores, they didn’t look all that difficult to construct. I realized between leftover scrap wood and odds ‘n ends acquired from various IKEA furniture purchased, I probably had enough to put something together.


Pinterest Project: Built-in Closets
My wife and I had kicked around the idea of eliminating all dressers and big, bulky furniture storage from our bedroom for awhile. The question was how. We had already decided on a bed from Ikea with built in drawers beneath the bed, but that was better for things like blankets and seasonal clothing. After sometime on Pinterest, we settled on building drawers and shelving on our closets, eliminating the need for standard dressers.
From there, we sketched out some ideas. My wife wanted more shelving and hanging options for clothing, along with a shoe rack. With my preference for t-shirts, I needed some sort organizational option that didn’t involve folding.
Aside from the shoe rack, which was a Target purchase, the rest is built to her preferences. Plenty of cardigan shelving, three deep drawers and hanging space on each side.
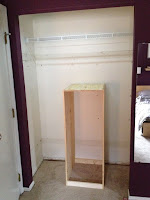


And here the pictures from my wife's closet:


From there, we sketched out some ideas. My wife wanted more shelving and hanging options for clothing, along with a shoe rack. With my preference for t-shirts, I needed some sort organizational option that didn’t involve folding.
Aside from the shoe rack, which was a Target purchase, the rest is built to her preferences. Plenty of cardigan shelving, three deep drawers and hanging space on each side.
I swapped out the shoe rack for a pull-out pants organizer, and utilized some repurposed wire racks for shoe storage under the dress shirts. For the t-shirts, I bought two 10-foot PVC pipes, but them down to about 11 inches, and glued them all together.
Both closets have two strips of motion sensor lights above the opening, so the lack of lighting is somewhat negated.
Between the two closets, we spent about $250 in materials (not including the shoe rack, which we already owned), and about four days each from demo to finishing painting.
Here are the pictures from my closet:


And here the pictures from my wife's closet:


Pinterest Project: Pull-Out Kitchen Cabinet Drawers
While previous Pinterest projects have focused on more decorative ideas, I also found a number of very practical ideas that have turned into projects. The first one I tackled was for the kitchen. To the left of our refrigerator there is a floor to ceiling pantry. The bottom two units had two shelves a piece, the smaller top two had one shelf each. We soon discovered the problem with these units – depth. In order to reach a can of soup in the back, all of the items up front would have to be removed. And for someone like me who bakes a lot, trying to organize the flour, sugars, baking chips, extracts and various other items was not fun. I found a number of different approaches to building pull-out drawers for the pantry.
Using some leftover wood from the previous homeowner, as well as a discarded set of drawer rails, I built a prototype drawer and installed it in the pantry. Having worked out the mounting and spacing issues to ensure the drawer opened and closed smoothly, I felt confident enough to head off to the local big box hardware store to purchase more wood and build a complete set. Here’s a look at how the pull-out pantry drawers turned out:

The second project was for under the counter. while there was storage space, there wasn't any shelving. That meant the pans we were keeping there were just piled on top of each other. Rather than build just a shelf, I decided we need something sturdier. I didn't have much of a plan, just measurements.
I ended up with the base of the drawer, but added bigger end pieces, rounded at the top, with some rounded wooden bars along each side. Now the pull-out caddy contains all the pans and such that were previously stacked on top of each other.

Pinterest Project: Canvas Wall Art
One of the many things we wanted to do with the new house was add some new artwork to the walls, but nothing store bought. With my Mom being an artist, we have a plethora of her pieces around, but decided we wanted to try making something on our own. Of course, Pinterest provided plenty of ideas for making unique and individual art for the home.
We decided to go with a few pieces of canvas, paint them and then apply vinyl artwork we found on Amazon.com. Here are the results of our canvas art project:
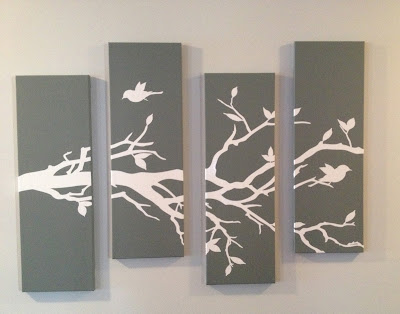
We decided to go with a few pieces of canvas, paint them and then apply vinyl artwork we found on Amazon.com. Here are the results of our canvas art project:

Pinterest Project: Pallet Wine Rack
One of the most interesting things I’ve found on Pinterest is the variety of projects involving old pallets. For over half a decade I spent morning on a loading dock never once considering the possibilities that these heavy space-eaters presented. The creativity involved in some of them is fascinating, and rightfully so things like pallet outdoor furniture can go for hundreds of dollars on Etsy. I made up my mind that my first attempt at a pallet project would be a wine rack, as it seemed the most manageable and provided plenty of options.
With these in mind, I was able to get my hands on an old pallet. I made some cuts, sanded it, pre-stained, stained and coated it with polyurethane before applying some stencils for fun. Here’s how my pallet wine rack turned out:
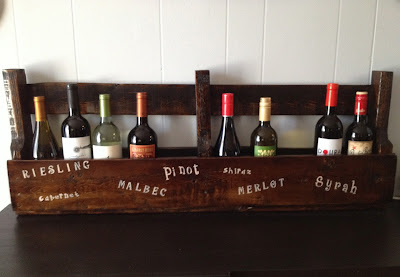
With these in mind, I was able to get my hands on an old pallet. I made some cuts, sanded it, pre-stained, stained and coated it with polyurethane before applying some stencils for fun. Here’s how my pallet wine rack turned out:

Pinterest Project: Picture Wall
Before moving into our new home during the Summer of 2013, my wife and I spent a lot of time on Pinterest looking at various ideas for the new place. Some ideas became reality, and the Pinterest Project series is going to document each one upon completion. For example, we really liked the idea of a picture wall we kept seeing - usually an eclectic mix of sizes and frames, combining artwork and photography.
So, with a big empty wall in our undefined living/dining area, we made our own picture wall – check it out:
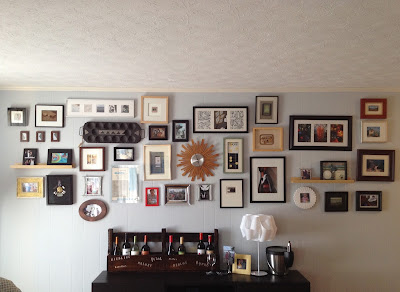
So, with a big empty wall in our undefined living/dining area, we made our own picture wall – check it out:

Subscribe to:
Posts (Atom)